Whether you’re struggling to reach a high window, dealing with heavy casement windows that are hard to open, or looking to upgrade your home with smart automation, a window opener (also known as an automatic window opener or electric window actuator) can be the perfect solution. However, with countless installation videos and confusing instruction manuals online, many homeowners find themselves overwhelmed: Which type of window opener should you choose? What are the critical installation steps? How do you ensure it’s mounted securely and safely?
Don’t worry—built on real-world installation experience and validated industry knowledge, this guide provides practical, step-by-step guidance for successful deployment., to provide you with a detailed, step-by-step window opener installation guide. Whether you’re installing a manual window crank, a chain actuator, or a linear actuator for skylights, you’ll find all the answers here. We’ll walk through each step with clear instructions, helpful tables, and practical tips to ensure your installation is successful.
📌 Reader Interaction: Before we begin, let’s get to know your project—what type of window are you planning to automate? Is it a hard-to-reach skylight, a heavy casement window, or are you looking to add smart home functionality? Drop your answer in the comments, and we’ll provide tailored advice for your specific situation!
Step 1: The “Three Essential Questions” Before Installation—Choose Right, Buy Right, Prepare Right
Many installation problems are actually rooted in inadequate preparation. So before you even pick up a drill, take time to properly plan.
1. Identify Your Window Type and Compatible Window Opener
Different window styles require different types of actuators. Choosing the wrong type can lead to installation failure or premature equipment failure.
| Window Type | Recommended Opener Type | Key Considerations |
|---|---|---|
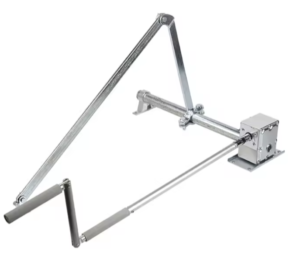
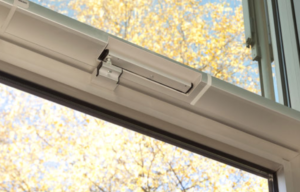
| Casement Windows (side-hinged, opens outward) | Chain Actuator / Push-Pull Arm | Mounts on the window frame; chain pushes the window open; clean, discreet appearance. |
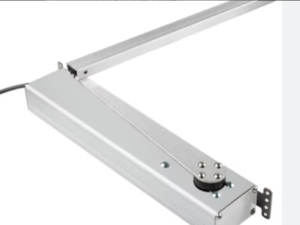
| Awning Windows (top-hinged, opens outward) | Chain Actuator | Similar to casement; chain actuator provides smooth, controlled movement. |
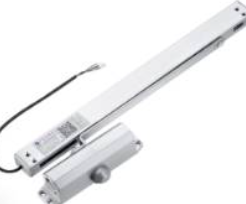
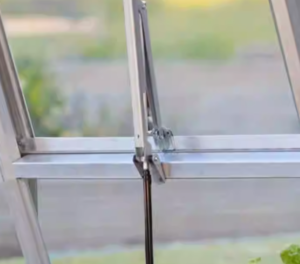
| Skylights / Roof Windows (horizontal or inclined installation) | Linear Actuator / Screw Drive Actuator | Requires strong pushing force and high waterproof rating (IP65 or higher recommended) to withstand rain and handle the window’s weight. |
| Sliding Windows | Sliding Window Opener | Motor drives the window panel horizontally. |
| Manual Casement Windows | Manual Window Crank | Ideal for windows blocked by sinks or furniture where you can’t reach; note that heavy windows require significant effort to operate. |


Bottom Line: Choose electric openers for high or heavy windows, waterproof linear actuators for skylights, and chain actuators for standard side-opening windows.
2. Verify Hardware Compatibility
Before unboxing, double-check these critical specifications to avoid wasted effort:
- Voltage Compatibility: Check whether your window opener requires 220VAC (standard household current) or 24VDC (low voltage). While 220V is common, 24V low-voltage systems are safer, especially in homes with children, elderly residents, or in humid environments like bathrooms and kitchens. Incorrect voltage connection will damage the motor .
- Push Force & Stroke Length: Confirm that the opener’s push force (measured in Newtons or pounds) and stroke length (how far it extends) are adequate for your window. Heavy windows require higher-force actuators—most quality manufacturers like Firgelli Automations clearly list these specifications.
- Window Frame Inspection: Manually open and close your window to check for smooth operation. If the frame is warped or the hinges are rusted, even the best window opener won’t function properly.
3. Gather Your Tools and Materials
“Measure twice, cut once” applies perfectly here. Having all necessary tools ready beforehand will make your installation process much smoother:

- Measurement & Marking: Tape measure, level, marking pen
- Drilling & Fastening: Power drill, appropriate drill bits, screwdriver set, stainless steel screws or expansion bolts (stainless steel is essential for rust prevention)
- Electrical & Sealing: Wire strippers, electrical tape, waterproof junction box, weather-resistant sealant (for outdoor installations)
- Safety Equipment: Insulated gloves, safety goggles (especially for ladder work)
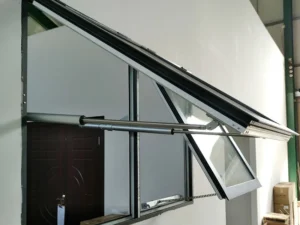
Step 2: Core Installation Process — Chain/Linear Actuator Example
This is the most common type of electric window opener installation. We’ll walk through a typical casement window chain actuator installation step by step.
1. Mount the Bracket
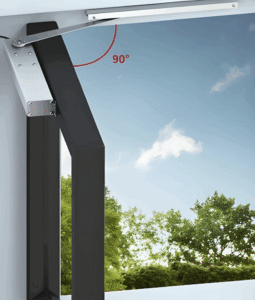
First, pre-attach the two mounting brackets (bases) to your window frame using screws. The critical factor is centering—ensure the chain extension direction is perfectly parallel to the window’s opening direction. Deviation should be less than 1 degree, or the chain will bind and wear prematurely.
2. Position and Install the Chain Head Bracket
Place the actuator body on its temporarily installed brackets with the chain fully retracted. Then manually extend the chain by about half an inch and use a marker to precisely mark the attachment point on the window sash. This position determines your window’s maximum opening angle.
Next, align the U-shaped bracket (chain head connector) with your marked point and securely fasten it to the window sash’s reinforcement rail—never directly to the glass.
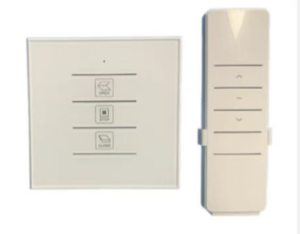
3. Electrical Wiring
This step requires the most technical expertise. Proceed with caution:
- Power Off: First, shut off the main circuit breaker to ensure you’re working with no live current.
- Connect the Controller: Following your product’s wiring diagram, correctly connect the actuator wires to the power supply and control switch wires. Always connect the ground wire to prevent electrical shock hazards.
- Weatherproofing: For outdoor installations, use a waterproof junction box or wrap all connections thoroughly with high-quality waterproof electrical tape. Create a “drip loop” in the wire where it enters the junction box to prevent rainwater from following the wire inside.
4. Mount the Actuator and Connect
Now position the actuator body back on its mounting brackets, leaving screws slightly loose for final adjustment:
- Connect Chain to Window Sash: Insert the chain head into the U-shaped bracket and secure with the connecting bolt and lock nut.
- Final Tightening: After confirming proper alignment and level positioning, fully tighten all mounting bracket screws.
Step 3: Testing and Calibration — Ensuring Long-Term Reliability
Completing the physical installation isn’t the finish line—careful calibration ensures years of trouble-free operation.
1. Limit Switch Calibration (Most Critical Step)
This is arguably the most important factor affecting your window opener’s lifespan. Electric window openers typically have built-in limit switches or adjustable travel settings:
- Calibration Method: Use the control switch to fully open and fully close the window.
- Adjustment Goal: Ensure that when fully open, the chain stops just before the window frame contacts the limit, and when fully closed, the window seals tightly without gaps. Improper limits can cause air leaks, water infiltration, or motor burnout from continuous overloading.
2. Operational Testing
- No-Load Test: Before connecting to the window, run the actuator through a full cycle to check for unusual noises or binding.
- Load Test: After connecting the window, cycle the window fully open and closed at least 5-10 times:
- Observe smooth, consistent operation
- Listen for abnormal sounds (normal operating noise should be under 60 decibels)
- Verify tight closure without air gaps
- Recheck all mounting screws for tightness
3. Weather Sealing
For skylight or outdoor installations, apply weather-resistant sealant around the base of the actuator as a final layer of waterproof protection.
📋 Industry Certifications & Safety Standards
To ensure installation quality and safety, we strongly recommend following standards from these authoritative industry organizations:
International Certifications
| Certification/Standard | Region | Core Requirements |
|---|---|---|
| UL 325 | United States | Safety standard for automatic garage door openers and gate systems (applicable to window openers), covering motor overload protection, anti-pinch features, etc. |
| CE Marking | European Union | Basic certification indicating compliance with EU safety, health, and environmental requirements. |
| RoHS | Global | Restriction of Hazardous Substances (lead, mercury, etc.), ensuring environmental safety. |
| IP Rating | Global | Ingress Protection: IP54 (dust-protected and splash-proof), IP65 (dust-tight and protected against low-pressure water jets), IP67 (temporary immersion). |
| ISO 9001 | Global | Quality management system certification ensuring consistent manufacturing quality. |
✅ Purchasing Tip: When selecting a window opener, verify that the packaging and manual display these certification marks. For outdoor and skylight installations, choose products with IP65 or higher protection ratings.
Industry Organizations
- AAMA (American Architectural Manufacturers Association): Sets performance standards for windows and related hardware. Products meeting AAMA standards offer better durability, weather resistance, and wind load performance.
- UL (Underwriters Laboratories): Globally recognized safety certification organization. UL certification means the product has passed rigorous safety testing.
- NFPA 70 (National Electrical Code): The standard for safe electrical installation in the U.S., covering all wiring requirements for window openers.
Installation Qualifications
According to the International Building Code (IBC) and local regulations, certain installations require professional qualifications:
- Electrical Work: Should be performed by a licensed electrician, especially for 220V direct-wire installations.
- High-Access Work: Skylight or second-story installations should be performed by professionals with proper ladder safety training and fall protection equipment.
⚠️ Safety Reminder: If you lack relevant expertise or qualifications, don’t hesitate to hire a professional. Safety always comes first.
📚 Sources & References
This guide synthesizes information from the following authoritative sources:
| Source | Type | Content Contribution |
|---|---|---|
| Family Handyman | Home Improvement Media | Installation steps, tool preparation |
| This Old House | Home Improvement TV Program | Installation techniques, common problem troubleshooting |
| NFPA 70 (NEC) | National Electrical Code | Electrical wiring safety standards, voltage requirements |
| ESFI | Electrical Safety Foundation International | Home circuit safety guidelines, shock prevention |
| UL Standards | UL Standards | Electric opener safety standards (UL 325) |
| AAMA | American Architectural Manufacturers Association | Window and opener performance standards |
| ICCSAFE | International Code Council | Building codes, installation qualification requirements |
| Firgelli Automations | Manufacturer | Product specifications, installation instructions |
| A-OK Motors | Manufacturer | Smart opener technical specifications |
💬 Reader Interaction & Frequently Asked Questions
📝 Comment Section
Share your installation experience or questions in the comments! We respond to every message within 24 hours.
Ways to participate:
- ✅ Share your successful installation story
- ✅ Ask questions about installation challenges
- ✅ Add tips not covered in this guide
- ✅ Upload before/after photos (image comments supported)
Featured Reader Comments:
@DIY_Mike (March 2024):
“Just installed a linear actuator on my skylight following these steps. One thing I’d emphasize—don’t skimp on the sealant! I applied too lightly the first time and had leaks during the first rainstorm. Re-did it with a full bead and it’s been perfect. Thanks for the detailed guide!”
@HomeownerSarah (February 2024):
“Question: My casement window is pretty heavy—the chain actuator I bought seems to struggle. Should I have gone with a linear actuator instead? Also, which voltage is safer for a child’s bedroom?”
@Author Response:
“Yes, for heavy windows, linear actuators provide significantly more push force and are definitely the better choice. For voltage, 24V DC low-voltage systems are absolutely the safer option for children’s rooms—they’re less hazardous if curious little hands explore around the mechanism.”
❓ Frequently Asked Questions
| Question | Answer |
|---|---|
| Q1: Can I install a window opener myself? | If you’re comfortable with basic DIY skills and can identify household wiring, yes. But if uncertain, hiring a professional is worth the investment. |
| Q2: How long does installation take? | An experienced installer takes about 1-2 hours. First-timers should budget 3-4 hours, including reading instructions and calibration time. |
| Q3: How long do window openers last? | Quality electric window openers typically last 5-10 years with normal use. Regular lubrication and cleaning significantly extend lifespan. |
| Q4: How do I troubleshoot a broken opener? | First check power supply and limit switches (80% of issues originate here). If the motor burned out or gears stripped, replacement parts or whole unit replacement may be needed. |
| Q5: Can window openers integrate with smart home systems? | Yes. Many brands offer Wi-Fi, Zigbee, or Z-Wave connectivity compatible with Alexa, Google Home, and Apple HomeKit. |
| Q6: Manual crank vs. electric opener—which is better? | Manual cranks are affordable and sufficient for accessible windows. Choose electric for high windows, heavy windows, or if you’re building a smart home system. |
📱 Quick Poll
What’s your main reason for installing a window opener?
- 🔘 A. Hard-to-reach windows (too high to reach comfortably)
- 🔘 B. Windows are too heavy for family members to operate
- 🔘 C. Smart home upgrade for remote control convenience
- 🔘 D. Automated ventilation scheduling
- 🔘 E. Other (please specify in comments)
Reply with your option in the comments, and we’ll create follow-up content based on your interests!
📧 Get More Resources
- Free Installation Checklist PDF: Follow our account and message “Window Opener Checklist” to receive a printable step-by-step installation checklist
- Video Tutorial: Scan the QR code (or visit our website) to watch our complete window opener installation video guide
- Live Support: If you encounter urgent installation issues, use the chat widget to reach our technical advisors (weekdays 9:00 AM – 6:00 PM)
Appendix: Common Problems & Maintenance Tips
| Common Issue | Possible Cause | Solution |
|---|---|---|
| Window won’t close fully / won’t open | Limit switches misadjusted; window frame warped | Recalibrate limits; inspect and repair window frame |
| Unusual noise / binding during operation | Lack of lubrication; installation not parallel; gear wear | Apply lithium-based lubricant; check mounting alignment; contact professional repair |
| Motor doesn’t run | No power; voltage mismatch; motor burned out | Check circuit and voltage; replace motor if necessary |
| Manual crank slips | Gear wear | Replace handle or entire gearbox |
| Remote / smart control not working | Signal interference; controller failure; loose connections | Check controller wiring; re-pair remote |
Maintenance Recommendations:
- Regular Lubrication: Every 3-6 months, apply lithium-based lubricant to chains or racks to maintain smooth operation.
- Cleaning: Keep the opener body clean and free from dirt buildup. Inspect sealant and junction boxes before rainy seasons.
- Gentle Operation: Never manually force the window while the opener is running.
Conclusion
We hope this comprehensive guide helps you successfully complete your window opener installation. If you’re not confident with electrical work or dealing with dangerous high-access installations (such as roof skylights), we strongly recommend hiring qualified professionals. You can find certified local installers through platforms like Angi—safety should always be your top priority.
After completing your installation, come back and share your success story in the comments! Your experience could help countless others who are on the fence about tackling this project.
Coming Next: Smart Window Opener Buying Guide: 5 Parameters That Determine Whether You’ll Love or Hate Your Purchase — stay tuned!
Article Last Updated: March 2025
Copyright Notice: Original content. Reproduction without permission is prohibited. For citations, please credit the source and retain the original link.